آموزش ها
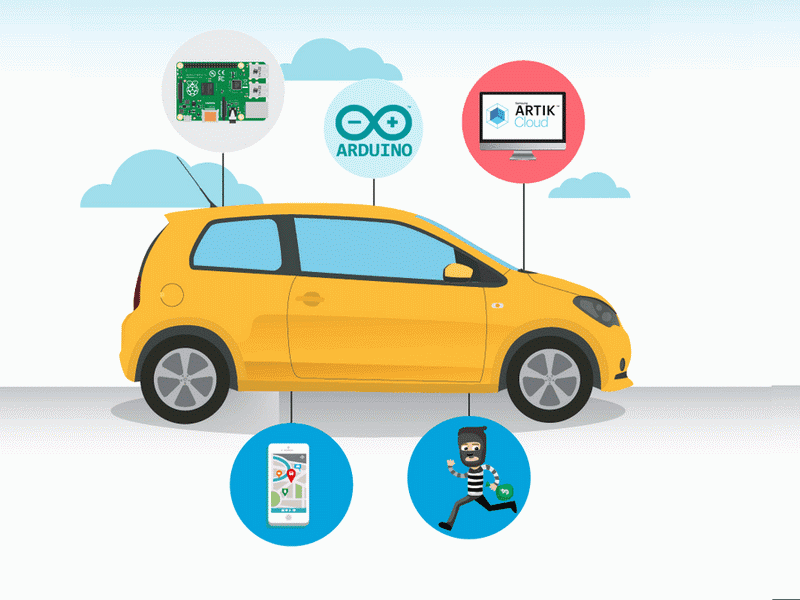
ماشین هوشمند با آردوینو

ماشین هوشمند با آردوینو:
اقلام مورد استفاده:
آردوینو نانو Arduino NANO
ماژول فاصله سنج التراسونیک ultrasonic SRF04
بیزر 12 ولت buzzer (12m)
تشخیص حرکت PIR HC-RS501
آنتن gps 1575.42MHZ
رسپری پای Raspberry Pi 3 Model B
LED 5m Red ال ای دی قرمز (oval)
مقاومت 220 اهم 1/4 وات
برد برد سایز متوسط breadboard
سیم برد بردی 40 تایی دو سر نری


پک اقلام مورد نیاز:
در مورد این پروژه ماشین هوشمند با آردوینو :
چند بار ماشین خود را پارک کرده اید و فراموش کرده اید کجاست؟
چقدر برای شما سخت است که ماشینتان را پارک کنید و بدانید فاصله بین خود و ماشین پشت سرتان چقدر است؟
گاهی ماشینت را به پسرت می دهی و نمی دانی کجاست.
با این دستگاه می توانید به راحتی موقعیت خودروی خود را ردیابی کنید.
این کیت به شما کمک می کند مکان ماشین خود را پیدا کنید و با استفاده از تلفن همراه خود زنگ هشدار را فعال کنید. با خواندن طول و عرض جغرافیایی و قرار دادن مختصات در نقشه های گوگل می توانید موقعیت خودروی خود را بدست آورید.
این یک آموزش گام به گام است که نحوه ساخت این سیستم از جمله اجزای سازنده را نشان می دهد.
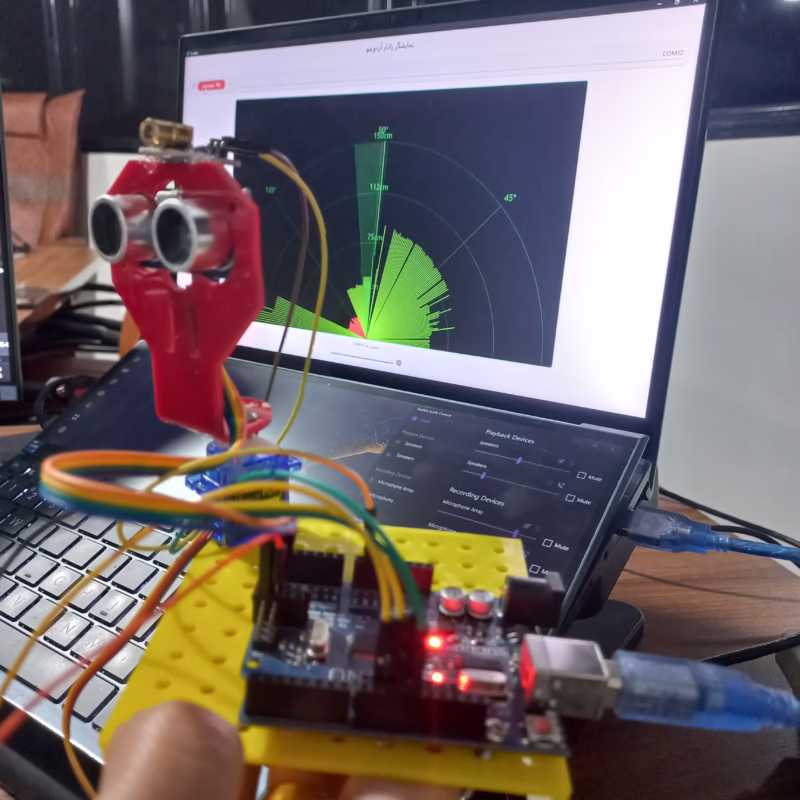
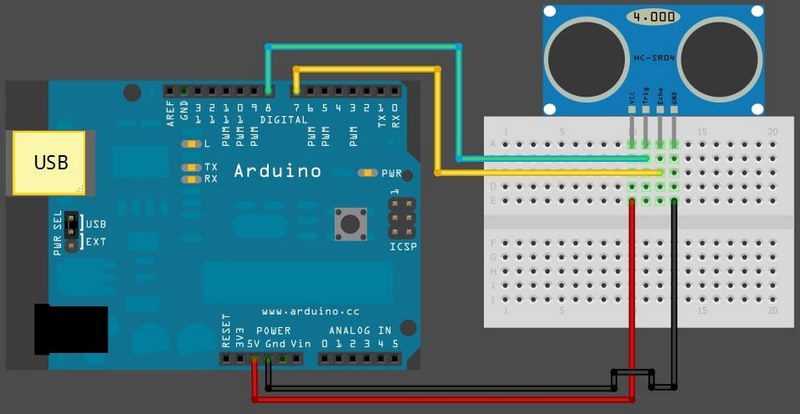
سنسور اولتراسونیک:
کد پایه سنسور اولتراسونیک که فاصله بین سنسور و جسم مقابل را چاپ می کند:
//ultrasonic Arduino code
#define echoPin 7 // Echo Pin
#define trigPin 8 // Trigger Pin
long duration, distance ; // Duration used to calculate distance
void setup() {
pinMode(trigPin, OUTPUT);
pinMode(echoPin, INPUT);
Serial.begin (9600);
}
void loop() {
/* The following trigPin/echoPin cycle is used to determine the
distance of the nearest object by bouncing soundwaves off of it. */
digitalWrite(trigPin, LOW);
delayMicroseconds(2);
digitalWrite(trigPin, HIGH);
delayMicroseconds(10);
digitalWrite(trigPin, LOW);
duration = pulseIn(echoPin, HIGH);
//Calculate the distance (in cm) based on the speed of sound.
distance = duration/58.2;
Serial.println(distance);
//Delay 50ms before next reading.
delay(50);
}
زنگ:
کد Buzzer که برای نشان دادن فاصله جسم در جلو یا پشت خودرو در حالت پارک استفاده می شود همچنین در صورت روشن بودن خودرو در حالت امنیتی به کاربر هشدار می دهد:

const int freq = 500;
const int dur = 20;
const int buzzer = 3;
void setup() {
 // put your setup code here, to run once:
 pinMode(buzzer, OUTPUT);
}
void loop() {
 // put your main code here, to run repeatedly:
 tone(buzzer, freq, dur);
 delay(50);
}
ماژول جی پی اس:
کد GPS NMEA 6m که به ما طول و عرض جغرافیایی می دهد که در هر زمان از خطوط نظر داده شده در ابتدا با // استفاده نمی کنیم و در صورت تمایل می توانید آنها را لغو نظر کنید.
در اینجا ویدیو توضیح داده شده است که چگونه کار می کند:
#include "TinyGPS++.h"
#include "SoftwareSerial.h"
SoftwareSerial serial_connection(10, 11); //RX=pin 10, TX=pin 11
TinyGPSPlus gps;//This is the GPS object that will pretty much do all the grunt work with the NMEA data
void setup()
{
Serial.begin(9600);//This opens up communications to the Serial monitor in the Arduino IDE
serial_connection.begin(9600);//This opens up communications to the GPS
Serial.println("GPS Start");//Just show to the monitor that the sketch has started
}
void loop()
{
while(serial_connection.available())//While there are characters to come from the GPS
{
gps.encode(serial_connection.read());//This feeds the serial NMEA data into the library one char at a time
}
if(gps.location.isUpdated())//This will pretty much be fired all the time anyway but will at least reduce it to only after a package of NMEA data comes in
{
//Get the latest info from the gps object which it derived from the data sent by the GPS unit
Serial.println("Satellite Count:");
Serial.println(gps.satellites.value());
Serial.println("Latitude:");
Serial.println(gps.location.lat(), 6);
Serial.println("Longitude:");
Serial.println(gps.location.lng(), 6);
Serial.println("Speed MPH:");
Serial.println(gps.speed.mph());
Serial.println("Altitude Feet:");
Serial.println(gps.altitude.feet());
Serial.println("");
}
}
/*
* $GPRMC,183729,A,3907.356,N,12102.482,W,000.0,360.0,080301,015.5,E*6F
$GPRMB,A,,,,,,,,,,,,V*71
$GPGGA,183730,3907.356,N,12102.482,W,1,05,1.6,646.4,M,-24.1,M,,*75
$GPGSA,A,3,02,,,07,,09,24,26,,,,,1.6,1.6,1.0*3D
$GPGSV,2,1,08,02,43,088,38,04,42,145,00,05,11,291,00,07,60,043,35*71
$GPGSV,2,2,08,08,02,145,00,09,46,303,47,24,16,178,32,26,18,231,43*77
$PGRME,22.0,M,52.9,M,51.0,M*14
$GPGLL,3907.360,N,12102.481,W,183730,A*33
$PGRMZ,2062,f,3*2D
$PGRMM,WGS 84*06
$GPBOD,,T,,M,,*47
$GPRTE,1,1,c,0*07
$GPRMC,183731,A,3907.482,N,12102.436,W,000.0,360.0,080301,015.5,E*67
$GPRMB,A,,,,,,,,,,,,V*71
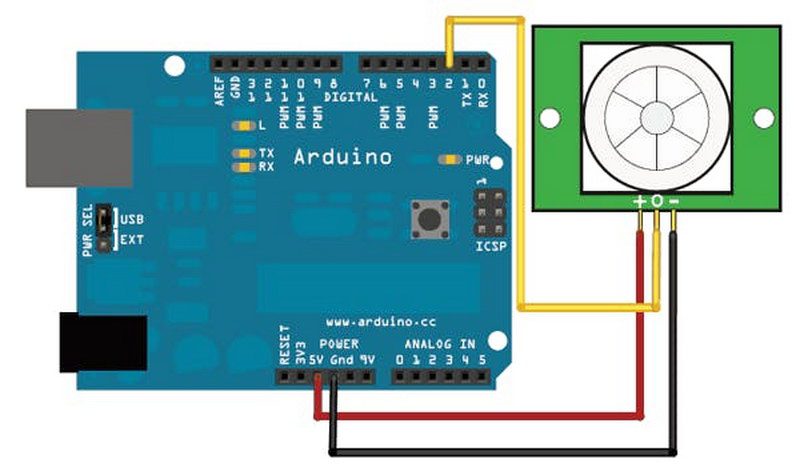
*/ سنسور حرکت PIR:
سنسور تشخیص حرکت PIR یک سنسور است که مادون قرمز را از هر جسم زنده ای احساس می کند، بنابراین اگر حالت ایمن را فعال کنید، حضور هر کسی را در ماشین تشخیص می دهد، زنگ هشدار باعث می شود اگر کسی را حس کند ولتاژ بالا و در صورت وجود کم است. هیچ بدنه ای نیست که بتوانید این سنسور را با استفاده از دکمه متصل به همان پین های دارای مقاومت شبیه سازی کنید.
/* PIR sensor tester*/
int ledPin = 13; // choose the pin for the LED
int inputPin = 2; // choose the input pin (for PIR sensor)
int pirState = LOW; // we start, assuming no motion detected
int val = 0; // variable for reading the pin status
void setup() {
pinMode(ledPin, OUTPUT); // declare LED as output
pinMode(inputPin, INPUT); // declare sensor as input
Serial.begin(9600);
}
void loop(){
val = digitalRead(inputPin); // read input value
if (val == HIGH) { // check if the input is HIGH
digitalWrite(ledPin, HIGH); // turn LED ON
if (pirState == LOW) {
// we have just turned on
Serial.println("Motion detected!");
// We only want to print on the output change, not state
pirState = HIGH;
}
} else {
digitalWrite(ledPin, LOW); // turn LED OFF
if (pirState == HIGH){
// we have just turned of
Serial.println("Motion ended!");
// We only want to print on the output change, not state
pirState = LOW;
}
}
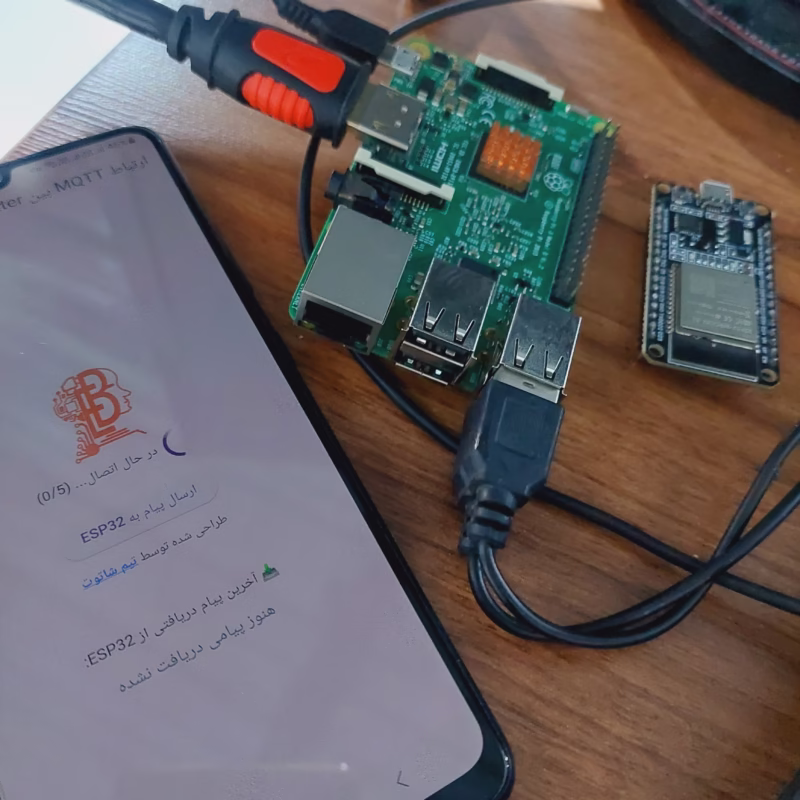
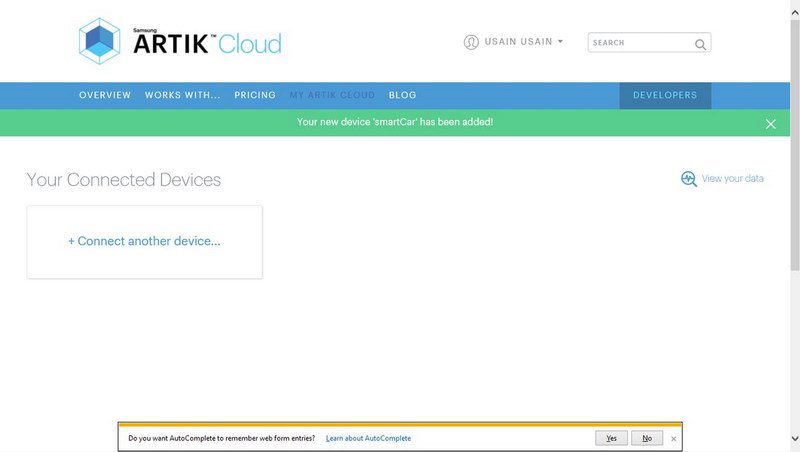
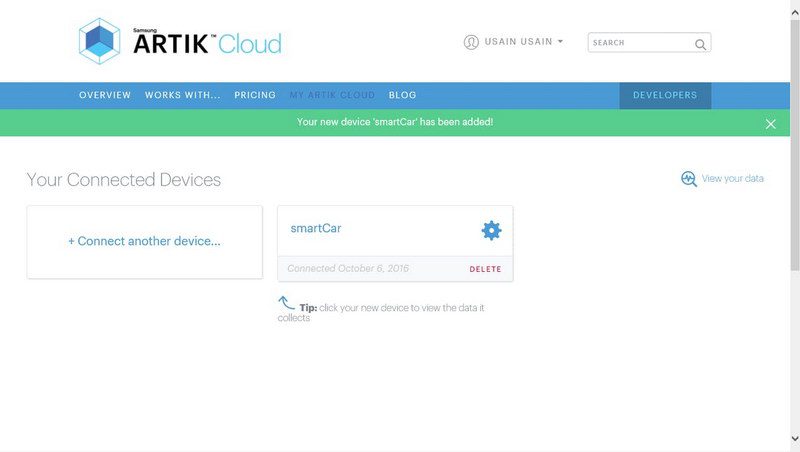
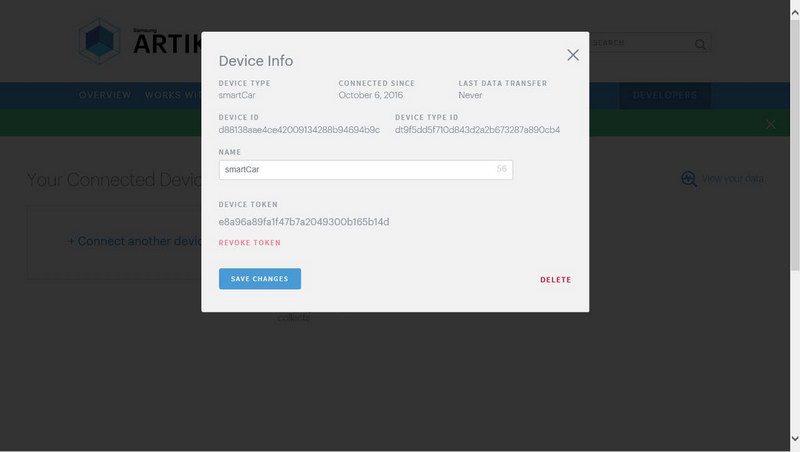
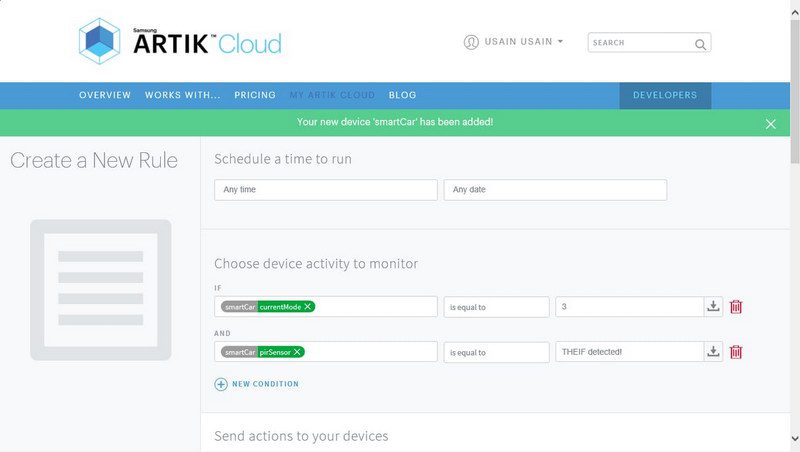
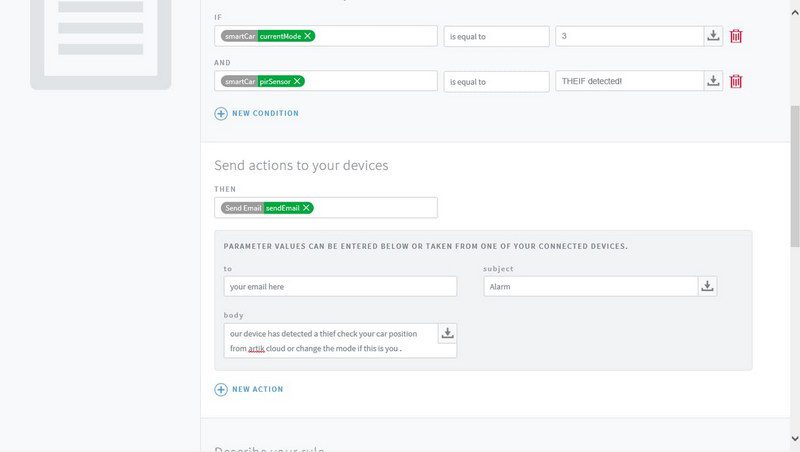
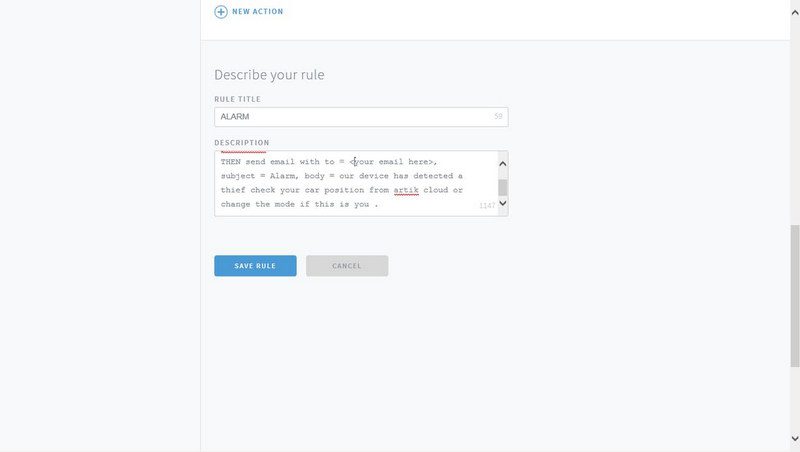
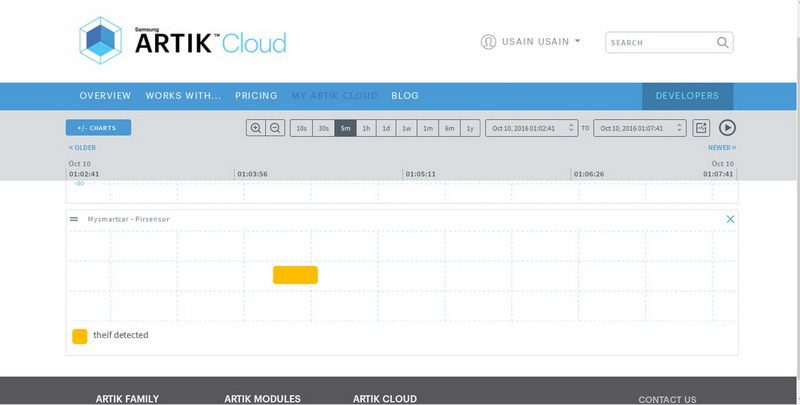
} در اینجا مراحل ایجاد دستگاه artik و اتصال آن به ابر و ایجاد قانون برای آن آورده شده است:


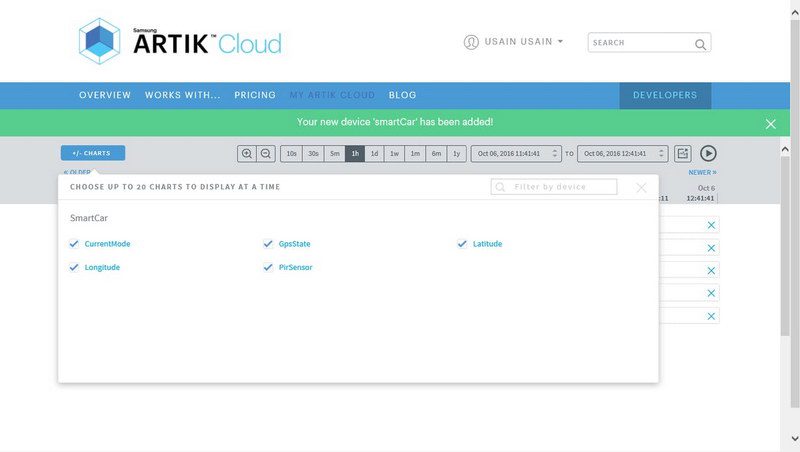

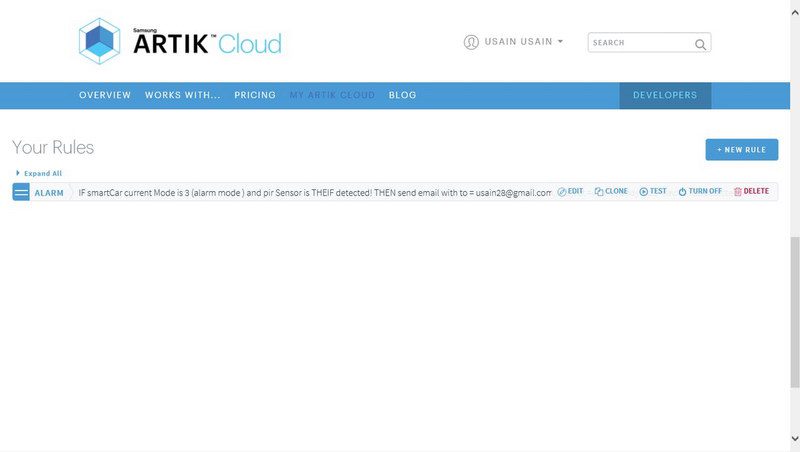


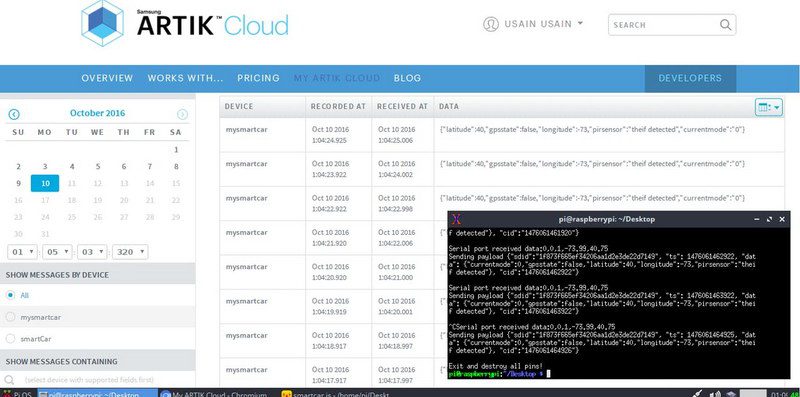

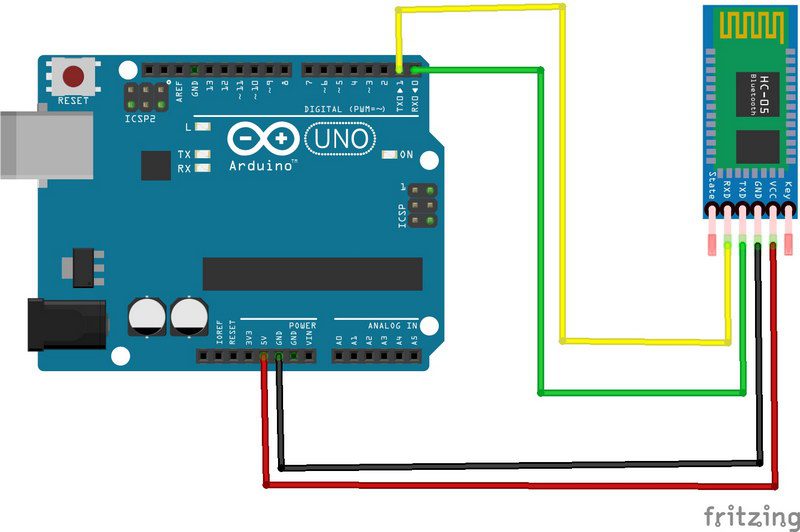
سیم کشی این همه:
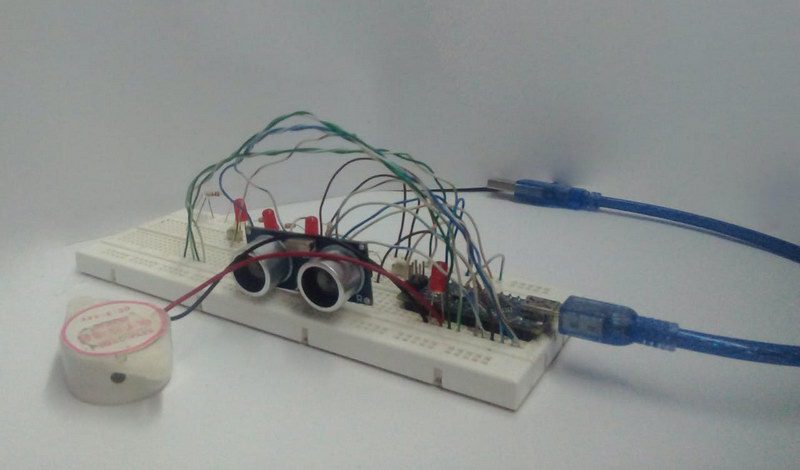
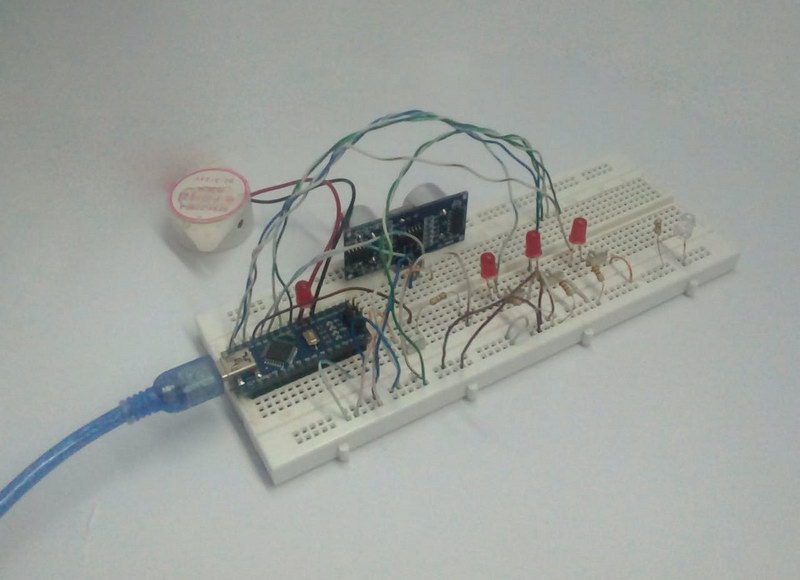
تست 3 حالت (حالت پارک، حالت هشدار، حالت خاموش) و سنسور اولتراسونیک با GPS و Raspberry Pi متصل:
در اینجا سنسور اولتراسونیک و صدای زنگ را تست می کنیم که وقتی دستمان نزدیکتر شود صدای آن را افزایش می دهد (ببخشید مشکلی در صدا در ویدیو وجود داشت آن را به روز خواهیم کرد) همچنین ممکن است متوجه شوید که به جای سنسور PIR از یک سوئیچ برای تشخیص استفاده شده است. حالت سرقت دزدی را به این صورت ساختم تا با سیم کشی کمتر روی بردبرد فقط برای نمایش ساده تر شود، اما مفهوم یکسان است.
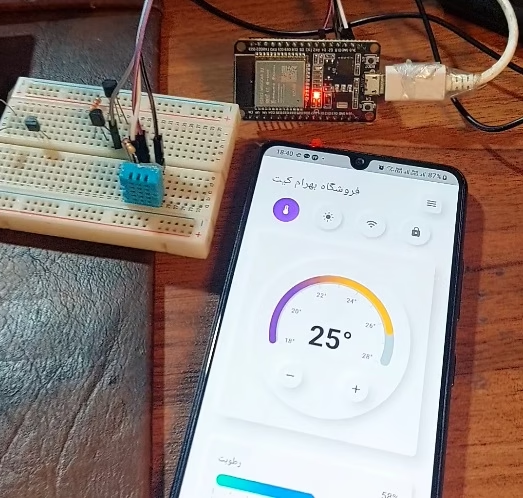
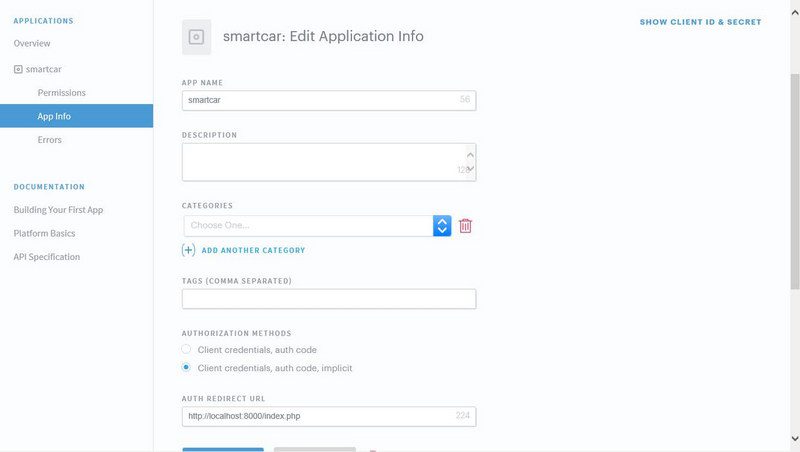
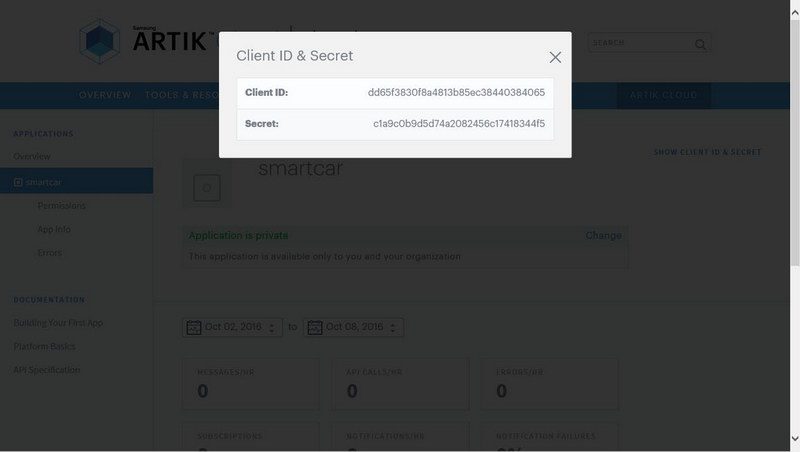
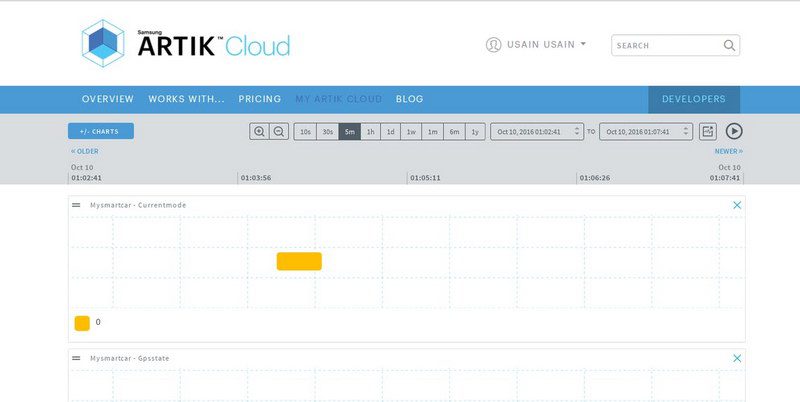
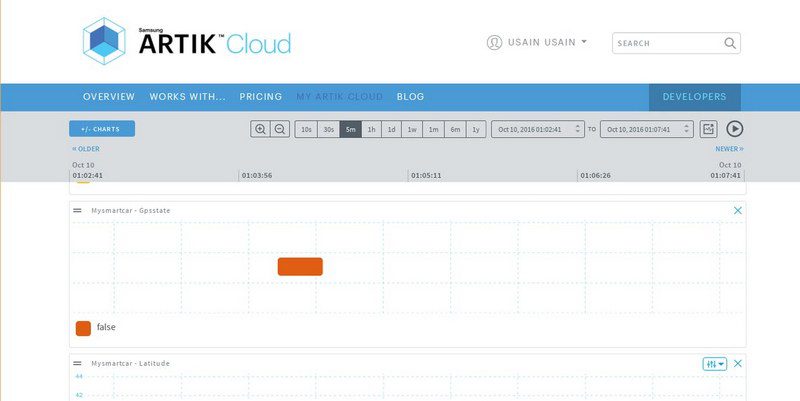
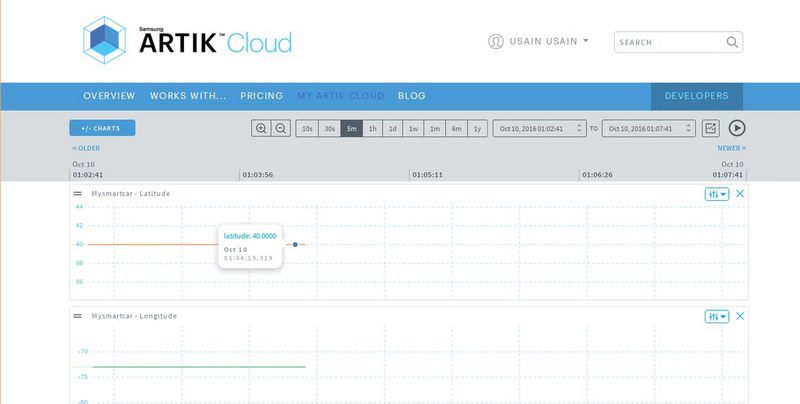
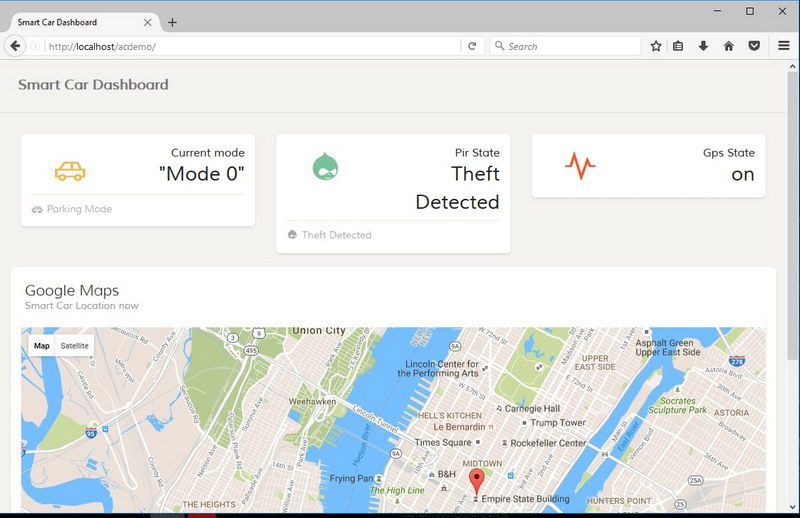
افزودن برنامه وب:
برای ایجاد برنامه وب با dashboard برای نظارت بر داده ها، این آموزش را دنبال کنید.
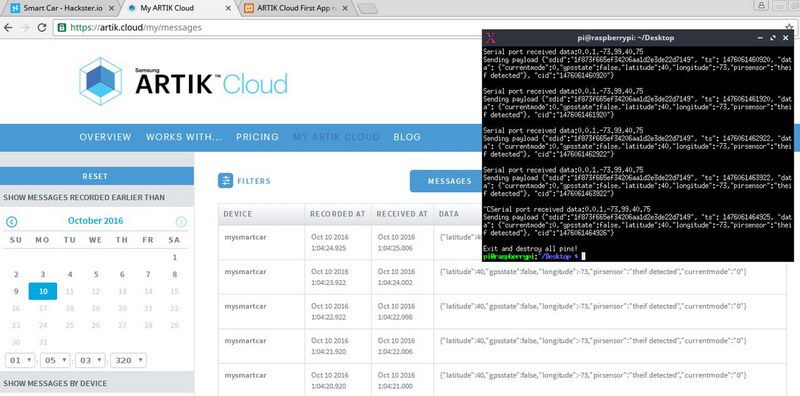
در اینجا در نهایت وب سایت داشبورد است:
کد:
//==============================================
// led constants from pin 10 to 12
//==============================================
const int ledPin1 = 10;     // parking mode
const int ledPin2 = 11;     // find my car mode
const int ledPin3 = 12;     // theif alarm mode

// variables will change:
int ledState1 = LOW;         // variable for reading the led 1 status
int ledState2 = LOW;         // variable for reading the led 2 status
int ledState3 = LOW;         // variable for reading the led 3 status

//==============================================
// pir sensor constants
//==============================================
int inputPin = 9 ; // choose the input pin (for PIR sensor)
int pirState = LOW ; // we start, assuming no motion detected
int pirval = 0; // variable for reading the pin status

//==============================================
// police buzzer constants
//==============================================
const int freq = 500;
const int dur = 10;
const int buzzer = 3;

//==============================================
// GPS constants
//==============================================
#include "TinyGPS++.h"
#include "SoftwareSerial.h"
SoftwareSerial serial_connection(5, 4); //RX=pin 5, TX=pin 4
TinyGPSPlus gps;//This is the GPS object that will pretty much do all the grunt work with the NMEA data
long Latitude ,  Longitude ;

//==============================================
// Ultrasonic Sensor constants
//==============================================
#define echoPin 7 // Echo Pin
#define trigPin 8 // Trigger Pin
long duration, distance ; // Duration used to calculate distance

//==============================================
// Declaring values to be printed
//==============================================
int mode = 0 ;
int gpsState = false ;

void setup()
{

  // initialize the led pin as an input

  pinMode(ledPin1, INPUT);
  pinMode(ledPin2, INPUT);
  pinMode(ledPin3, INPUT);

  // declare sensor as input

  pinMode(inputPin, INPUT);
  Serial.begin(9600);

  // declare buzzer pin as output

  pinMode(buzzer, OUTPUT);

  // GPS declaration
  serial_connection.begin(9600);//This opens up communications to the GPS
  Serial.println("GPS Start");//Just show to the monitor that the sketch has started

  //Ultrasonic declaration
  pinMode(trigPin, OUTPUT);
  pinMode(echoPin, INPUT);

}

void loop() {
  // read the state of the pushbutton value:
    ledState1 = digitalRead(ledPin1);
    ledState2 = digitalRead(ledPin2);
    ledState3 = digitalRead(ledPin3);

  //read the GPS values
    while(serial_connection.available())//While there are characters to come from the GPS
    {
    gps.encode(serial_connection.read());//This feeds the serial NMEA data into the library one char at a time
    }
    if(gps.location.isUpdated())//This will pretty much be fired all the time anyway but will at least reduce it to only after a package of NMEA data comes in
    {
   //Get the latest info from the gps object which it derived from the data sent by the GPS unit
    Latitude =  gps.location.lat() ;
    Longitude =  gps.location.lng();
    }


  // check the mode that is chosen .

  //++++++++++++++++++++++++++++++++++++++++++++++++++++++++++++++++++++++
  // device off MODE
  //++++++++++++++++++++++++++++++++++++++++++++++++++++++++++++++++++++++

   if (ledState1 == LOW && ledState2 == LOW && ledState3 == LOW)
    {
     mode = 0 ;
     gpsState = true ;

 // print mode , pirState , gpsState , longtude , latitude
    Serial.print(String(mode)); //mode number
    Serial.print(",");
    Serial.print(String(pirState)); //print if there is somebody in the car or not
    Serial.print(",");
    Serial.print(String(gpsState));// gpsState
    Serial.print(",");
    Serial.print(String(Longitude));// Longitude
    Serial.print(",");
    Serial.println(String(Latitude));// Latitude
  }


  //++++++++++++++++++++++++++++++++++++++++++++++++++++++++++++++++++++++
  // PARKING MODE
  //++++++++++++++++++++++++++++++++++++++++++++++++++++++++++++++++++++++
  // if led 1 is HIGH then parking mode is active .
  else if (ledState1 == HIGH && ledState2 == LOW && ledState3 == LOW)
  {
   mode = 1 ;
   gpsState = false ;

   /* The following trigPin/echoPin cycle is used to determine the
 distance of the nearest object by bouncing soundwaves off of it. */

 digitalWrite(trigPin, LOW);
 delayMicroseconds(2);
 digitalWrite(trigPin, HIGH);
 delayMicroseconds(10);
 digitalWrite(trigPin, LOW);
 duration = pulseIn(echoPin, HIGH);

 //Calculate the distance (in cm) based on the speed of sound.
 distance = duration/58.2;

 int no =2;
 if(distance < 7){
   tone(buzzer, freq, dur);
   delay(distance*no);
 } else if (distance < 15){
   tone(buzzer, freq, dur);
   delay(distance*no);
 } else if (distance < 20){
   tone(buzzer, freq, dur);
   delay(distance*no);
 } else if (distance < 25){
   tone(buzzer, freq, dur);
   delay(distance*no);
 } else if (distance < 30){
   tone(buzzer, freq, dur);
   delay(distance*no);
 } else if (distance < 35){
   tone(buzzer, freq, dur);
   delay(distance*no);
 } else if (distance < 40){
   tone(buzzer, freq, dur);
   delay(distance*no);
 } else if (distance < 45){
   tone(buzzer, freq, dur);
   delay(distance*no);
 } else if (distance < 50){
   tone(buzzer, freq, dur);
   delay(distance*no);
 } else if (distance < 55){
   tone(buzzer, freq, dur);
   delay(distance*no);
 }

Serial.print(String(distance)); //mode number

 //Delay 50ms before next reading.
 delay(500);

 // values to be printed on the cloud in mode 1
 // print mode , pirState , gpsState , Longitude , Latitude
    Serial.print(String(1)); //mode number
    Serial.print(",");
    Serial.print(String(0)); //print if there is somebody in the car or not
    Serial.print(",");
    Serial.print(String(gpsState));// GPS State
    Serial.print(",");
    Serial.print(String(Longitude));// Longitude
    Serial.print(",");
    Serial.println(String(Latitude));// Latitude
     }


  //++++++++++++++++++++++++++++++++++++++++++++++++++++++++++++++++++++++
  // FIND MY CAR MODE
  //++++++++++++++++++++++++++++++++++++++++++++++++++++++++++++++++++++++
  // if led 2 is HIGH then gps tracking (find my car) mode is active .
  else if (ledState1 == LOW && ledState2 == HIGH && ledState3 == LOW)
  {

   mode = 2 ;
   gpsState = true ;

    // turn on alarm
   tone(buzzer, freq, 1500);
   delay(1000);
   tone(buzzer, freq, 500);
   delay(500);

 // values to be printed on the cloud in mode 1
 // print mode , pirState , gpsState , longitude , Latitude
    Serial.print(String(mode)); //mode number
    Serial.print(",");
    Serial.print(String(pirState)); //print if there is somebody in the car or not
    Serial.print(",");
    Serial.print(String(gpsState));// GPS State
    Serial.print(",");
    Serial.print(String(Longitude));// Longitude
    Serial.print(",");
    Serial.println(String(Latitude));// Latitude
      }

  //++++++++++++++++++++++++++++++++++++++++++++++++++++++++++++++++++++++
  // THIEF ALARM MODE
  //++++++++++++++++++++++++++++++++++++++++++++++++++++++++++++++++++++++

  // if led 3 is HIGH then alarm mode is active .
  else if (ledState1 == LOW && ledState2 == LOW && ledState3 == HIGH)
  {
   mode = 3 ;
   gpsState = true ;

   //check the PIR sensor state to make alarm & report car location if anybody entered the car
   pirval = digitalRead(inputPin); // read input value
   if (pirval == HIGH ) {

   // turn on alarm
   tone(buzzer, freq, 1000);
   delay(100);
   tone(buzzer, freq, 500);
   delay(500);

    }

    else {
    }


 // print mode , pirState , gpsState , longtude , Latitude
    Serial.print(String(3)); //mode number
    Serial.print(",");
    Serial.print(String(pirval)); //print if there is somebody in the car or not
    Serial.print(",");
    Serial.print(String(gpsState));// gpsState
    Serial.print(",");
    Serial.print(String(Longitude));// Longitude
    Serial.print(",");
    Serial.println(String(Latitude));// Latitude

  }


}
پروژه کامل آردوینو و کد آردوینو: این کد ترکیبی از تمام سنسورهایی است که باعث می شود دستگاه در 3 حالت کار کند. شماتیک ها: تصویر شماتیک کامل
منبع این مطالب: